
How to Install Claude Code on Windows and Start Using Skills: A Practical 2026 Guide
Claude Code on Windows is one of those tools that looks simple until you sit down to actually wire it up, and then you hit a wall of confusing surfaces, empty folders, and slash commands that “aren’t available in this environment.” I installed it on Windows 11, broke it a few times, and figured out exactly where the official guidance is misleading. This guide walks you through the whole thing end to end: the prerequisites, three ways to install community skills, a real local PHP workflow with Laragon, persistent instructions, and how to tame approval prompts without giving an AI agent the keys to your machine.
By the end you will have a working setup, you will know which command runs where, and you will not waste an afternoon wondering why your skills folder is empty. This is the practical Claude Code on Windows walkthrough I wish I had when I started. Let me save you the pain I went through.
Table of Contents
What Claude Code Desktop Is and Why Skills Matter
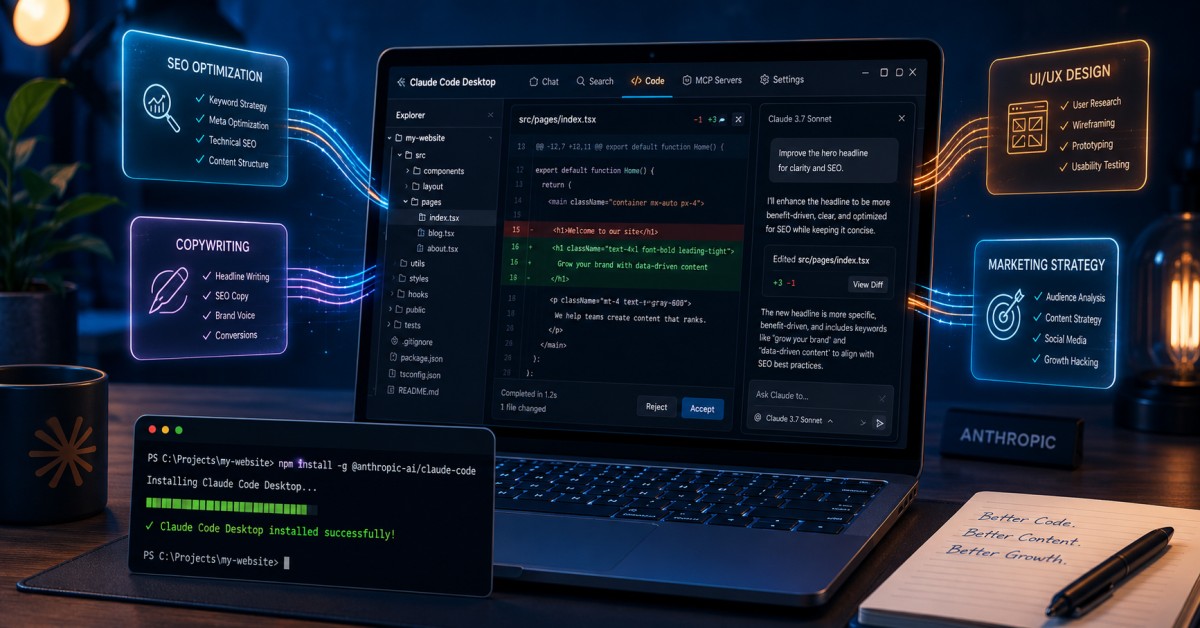
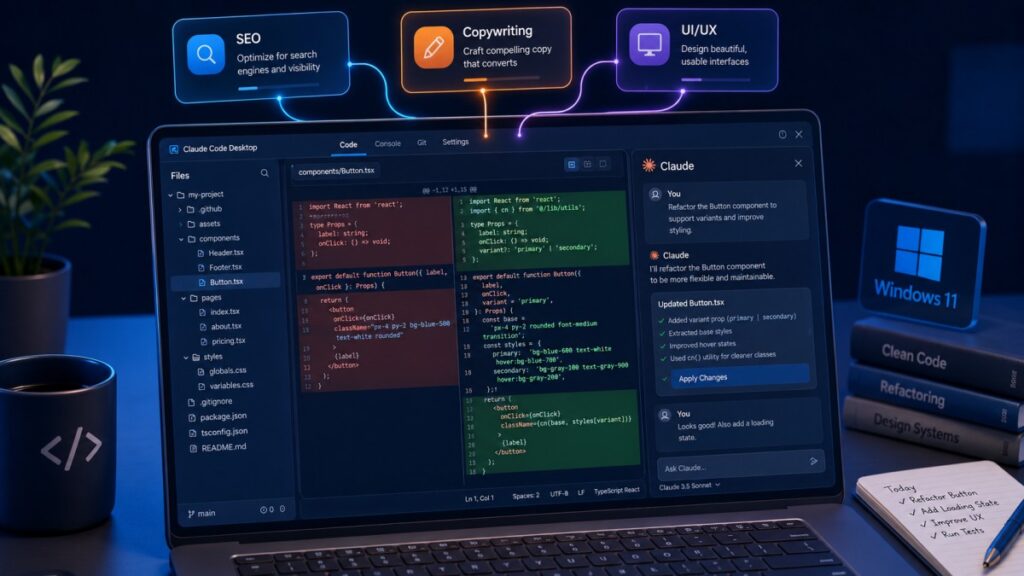
Claude Code is Anthropic’s agentic coding tool. Unlike the regular Claude chat, where you copy and paste snippets back and forth, Claude Code reads your actual project files, plans multi-step changes, edits files directly, runs commands, and iterates on the results. Running Claude Code on Windows means using it through the dedicated “Code” tab inside the Claude desktop application, with a graphical interface instead of a bare terminal. Getting Claude Code on Windows configured the right way is the foundation everything else in this guide builds on.
Skills are where this gets genuinely powerful. A skill is a reusable instruction set, packaged in a folder, that teaches Claude how to handle a specific type of task: writing conversion-focused copy, auditing security, designing a UI, or following your team’s coding conventions. Instead of re-explaining your standards in every session, you install a skill once and Claude loads it automatically whenever the work is relevant. The open ecosystem has exploded into tens of thousands of community skills, and pulling the good ones into your setup is the difference between a generic assistant and one tuned to how you actually build.
The Three Surfaces: Chat vs Desktop Code Tab vs CLI
This is the single biggest source of confusion, so let me clear it up before you touch a single command. There are three different places people interact with Claude, and they do not all behave the same way:
- The regular Claude chat (claude.ai in your browser, or the Chat tab in the desktop app). This is conversational only. It does not run slash commands like
/plugin. If you type a Claude Code command here, nothing happens. - The Claude Desktop app “Code” tab (the GUI). This runs Claude Code and edits your files, but interactive management commands like
/plugin,/permissions, and/configare not available here. Try one and you get a message that it “isn’t available in this environment.” - The standalone Claude Code CLI (you type
claudein a terminal). This is the only place/pluginworks.
Here is the part that makes it workable: the Desktop Code tab and the CLI share the same configuration folder on disk. So you can install skills using the CLI’s /plugin command, and they will show up automatically in the Desktop Code tab. You get the convenience of the GUI for day-to-day work and drop into the CLI only for the management commands the GUI does not expose. Keep this mental model and most of the “why isn’t this working” moments disappear. It is the first thing to get straight when you run Claude Code on Windows.
| Surface | Runs /plugin? | Edits your files? | Best for |
|---|---|---|---|
| Claude chat (browser / Chat tab) | No | No | Asking questions, planning |
| Desktop “Code” tab (GUI) | No | Yes | Daily coding work |
Claude Code CLI (claude) | Yes | Yes | Installing/managing skills and plugins |
Prerequisites on Windows: Node, Git, and Python
Before installing anything Claude-related, you need three pieces of tooling for Claude Code on Windows. Install them in this order, and pay attention to the heads-up after each one.
1. Node.js (LTS)
The Claude Code CLI is distributed as an npm package, so you need Node.js. Download the LTS build from nodejs.org and run the installer with default options. Verify it:
node --version
npm --version
2. Git for Windows
Many skill installers pull from GitHub repositories, and Claude Code’s own workflows lean heavily on Git. Install Git for Windows, then confirm:
git --version
3. Python 3.x (for some skills)
Some skills run a Python helper script under the hood, so you will want Python installed. The cleanest way on Windows is through the built-in package manager:
winget install Python.Python.3.12
Then verify. On Windows the command is usually python, not python3 as you would use on macOS or Linux:
python --version
⚠️ Heads-up: After installing Node, Git, or Python, you must close and reopen your terminal (PowerShell or Windows Terminal). New installs modify your PATH, and an already-open terminal will not see the change. If a freshly installed command reports “not recognized,” a terminal restart fixes it nine times out of ten before you start debugging anything deeper.
One more thing you will need throughout this guide: your Windows username, because it appears in nearly every path. To find it, run this in PowerShell:
echo $env:USERPROFILE
Wherever you see <username> in the paths below, substitute the actual name from that output (for example, C:\Users\husain\).
Installing the Claude Code CLI (And Why You Still Need It)
Even if you plan to run Claude Code on Windows mostly through the Desktop Code tab, install the CLI. It is the only surface that runs /plugin, so you will need it the moment you want to manage skills from the marketplace. Install it globally with npm:
npm install -g @anthropic-ai/claude-code
The -g (global) flag matters. It installs Claude Code to a fixed location regardless of which folder you happen to be sitting in. On Windows that location is:
C:\Users\<username>\AppData\Roaming\npm\
Once it finishes, close and reopen your terminal (PATH again), then launch it from inside any project folder:
claude
The first run walks you through authentication. After that, typing claude in a project directory starts an interactive session, and that is where the management commands become available.
Understanding Skills: Global vs Per-Project
Before installing skills for Claude Code on Windows, understand where they live, because this determines whether a skill is available everywhere or only in one project.
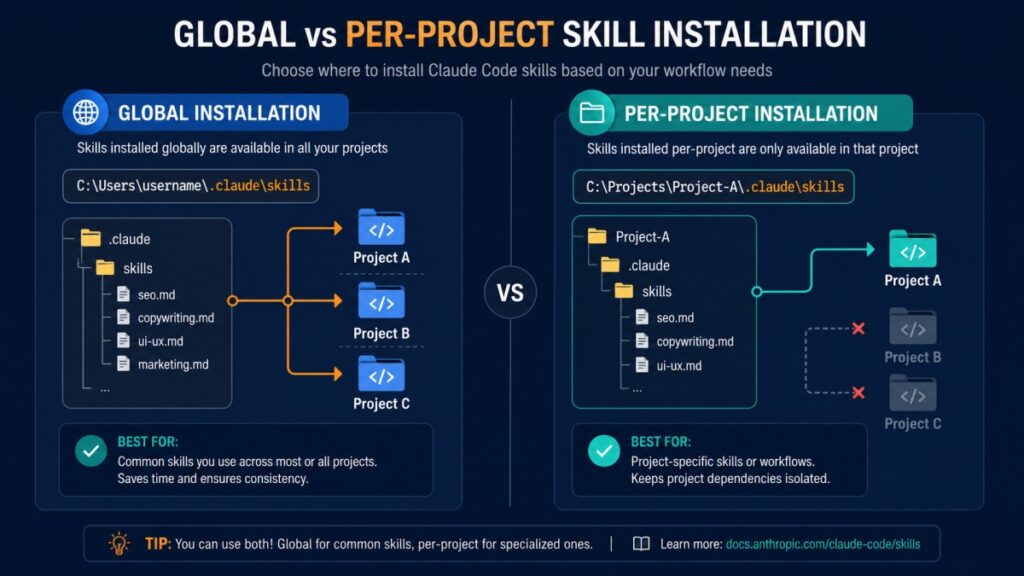
- Global (user-level) skills live in
C:\Users\<username>\.claude\skills\. Anything here is available in every project you open. Best for general-purpose skills you want everywhere, like copywriting or design. - Per-project skills live in a project’s own
.claude\skills\folder. These apply only to that project and can be committed to version control so your whole team shares them. Best for project-specific conventions.
⚠️ Heads-up: The leading dot in
.claudemakes the folder hidden in Windows Explorer. If you go looking for it and see nothing, enable “Hidden items” under the View menu in Explorer, or just navigate to it directly by pasting the full path into the address bar.
Because the Desktop Code tab and the CLI share the same C:\Users\<username>\.claude\ folder, a skill you install globally through the CLI will appear in the GUI automatically. There are three practical ways to get skills onto disk, each with honest tradeoffs. Let me walk through all three.
Inside the .claude Folder: Every File Explained
Skills are just one resident of the .claude folder. Once you understand the whole directory, configuring Claude Code on Windows stops feeling like guesswork. The first thing to know is that there are actually two .claude directories, not one, and they serve different scopes:
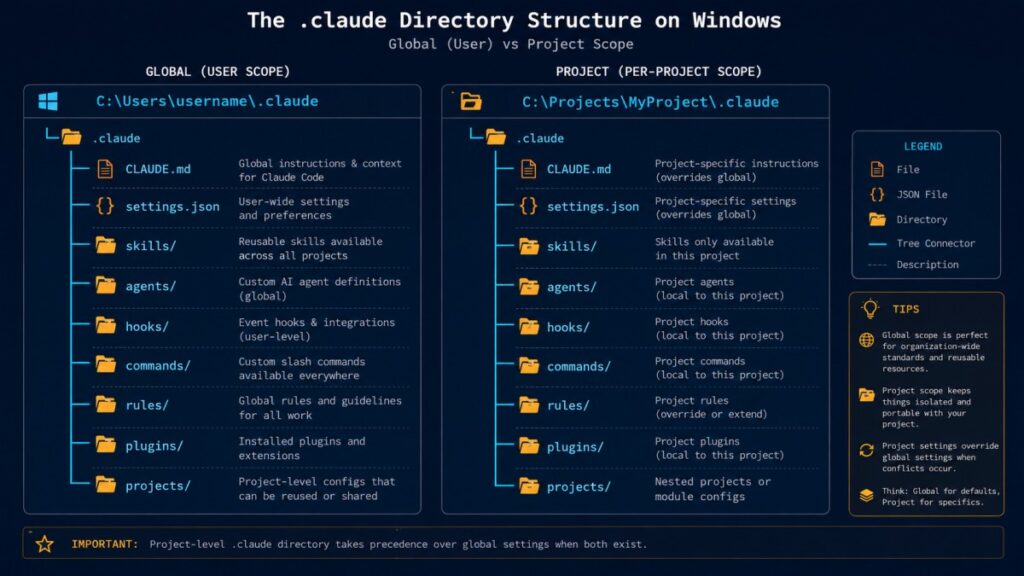
- The global directory at
C:\Users\<username>\.claude\(on Windows,~/.clauderesolves to%USERPROFILE%\.claude). Everything here is personal configuration that applies across all your projects. - The project directory at
<project>\.claude\. Everything here is scoped to that one repository and can be committed to git so your whole team shares it.
Claude Code reads both automatically at startup, and project files take precedence over global ones on conflicts. Here is what a fully configured pair of directories looks like. Most people only ever touch CLAUDE.md and settings.json; everything else is optional and added as you need it.
The global folder: C:\Users\<username>\.claude\
C:\Users\\
├── .claude.json              # Auth tokens + global preferences (do NOT delete)
└── .claude\
    ├── CLAUDE.md             # Your global instructions (every project)
    ├── settings.json         # Your global settings + permissions
    ├── skills\               # Personal skills (available everywhere)
    │   └── ui-ux-pro-max\
    │       └── SKILL.md       # The skill definition Claude reads
    ├── agents\               # Personal subagent personas
    │   └── code-reviewer.md
    ├── commands\             # Personal slash commands (legacy, prefer skills)
    │   └── review.md
    ├── hooks\                # PreToolUse / PostToolUse / Stop scripts
    │   └── block-secrets.ps1
    ├── plugins\              # Installed plugin manifests (do NOT hand-edit)
    └── projects\            # Per-session history + auto-memory
The project folder: C:\laragon\www\<project>\
C:\laragon\www\\
├── CLAUDE.md                 # Team instructions (commit to git)
├── CLAUDE.local.md           # Your personal overrides (gitignore this)
└── .claude\
    ├── settings.json         # Shared project settings (commit to git)
    ├── settings.local.json   # Local-only permission overrides (gitignore)
    ├── skills\               # Project-specific skills
    │   └── deploy\
    │       └── SKILL.md
    ├── agents\               # Project subagent personas
    │   └── security-auditor.md
    ├── commands\             # Project slash commands
    │   └── fix-issue.md
    ├── hooks\                # Project automation scripts
    │   └── block-push-to-main.ps1
    └── rules\                # Modular instruction files
        ├── code-style.md
        └── testing.md
That is a lot of files, so here is what each one actually does, when it loads, and whether you commit it.
| File / Folder | What it is for | When it loads | Commit to git? |
|---|---|---|---|
CLAUDE.md | Persistent instructions and memory: stack, conventions, workflow rules. Your highest-leverage file. | Always, at session start | Yes (project) / personal (global) |
CLAUDE.local.md | Personal instruction overrides you do not want your team to inherit. | Always, at session start | No (gitignore) |
settings.json | Permissions (allow/deny lists), hooks registration, environment variables, model defaults. | Always, at session start | Yes |
settings.local.json | Local-only permission overrides for one machine. Keeps an allow-all rule out of the shared repo. | Always, at session start | No (gitignore) |
skills\ | Reusable, packaged workflows. Each skill is a folder containing a SKILL.md plus optional supporting files. | Name + description at startup; full file on demand when relevant | Optional |
SKILL.md | The actual skill definition: metadata frontmatter plus the instructions Claude follows for that task. | Loaded when Claude decides the skill matches the request | Optional |
agents\ | Specialized subagent personas, each a markdown file with its own prompt, tool access, and model preference. | When Claude delegates to that agent | Optional |
commands\ | Custom slash commands. Filename becomes the command (review.md → /review). Now largely merged into skills. | When you invoke the command | Optional |
hooks\ | Scripts that fire on tool events (PreToolUse, PostToolUse, Stop) to block dangerous commands or auto-format. The strict enforcement layer. | On the matching tool event | Optional |
rules\ | Modular instruction files for when CLAUDE.md gets crowded. Split conventions by topic or path. | Automatically | Optional |
plugins\ | Manifests for plugins installed via /plugin install. Managed for you; do not hand-edit. | At startup | Global only |
projects\ | Per-session transcripts, history, and auto-memory that Claude writes during sessions. | Written during sessions | No |
.claude.json | Holds your authentication and global preferences. Lives in your home folder, not inside .claude\. | At startup | No |
⚠️ Heads-up: Do not delete
~/.claude.json,~/.claude\settings.json, or the~/.claude\plugins\folder. Those hold your auth tokens, preferences, and installed plugins, and removing them logs you out and wipes your plugin setup. Theprojects\folder, by contrast, is safe to delete if you want a clean slate; Claude Code rebuilds it. Also mind the casing:CLAUDE.mdmust be uppercase andsettings.jsonmust be lowercase, or they silently fail to load.
The practical takeaway: think of CLAUDE.md as guidance, settings.json as control, skills\ and agents\ as capability, and hooks\ as enforcement. Get CLAUDE.md and settings.json right first, then layer the rest on only when a recurring need justifies it.
Method A: Installing a Skill via the Marketplace
The Claude Code marketplace is the cleanest way to install skills globally. A marketplace is simply a GitHub repository that acts as a catalog. You add the catalog once, then install individual skills from it. Remember: this only works in the standalone CLI, so start a claude session in a terminal first.
Adding a marketplace registers the catalog but installs nothing yet:
/plugin marketplace add <github-user/repo>
Then install a specific skill or plugin from it, and when prompted choose the User scope to make it available across all your projects:
/plugin install <name>
⚠️ Heads-up: On Windows, the marketplace method can fail for certain repositories with an error like “Zip file contains a symbolic link.” This happens when the repo uses internal symlinks that the Windows unzip step refuses to extract. If you hit this, do not fight it for an hour. Switch to that repo’s own dedicated installer (Method C) if it has one, which is exactly the situation I ran into with a UI/UX design skill below.
When it works, this is my preferred method: it is clean, global, and managed. When it fails on the symlink error, the other two methods are your escape hatch.
Method B: Installing a Skill via npx skills
Many community skill packs are designed to be installed with a generic npx command that pulls straight from a GitHub repo. This installs into the current folder’s .claude\skills\ directory, so it is a per-project install. Make sure you are in the right project folder first, then run it.
A concrete example is a marketing skills pack at github.com/coreyhaines31/marketingskills, a collection of 40+ marketing skills covering CRO, copywriting, SEO, positioning, and analytics. You install it like this:
npx skills add coreyhaines31/marketingskills
⚠️ Heads-up: This is the gotcha that cost me the most time. On Windows,
npx skills addcreates symlinks, and symlinks can silently fail without Developer Mode enabled. The install will look like it succeeded, but your.claude\skills\folder ends up empty even though the files landed in a parallel.agents\skills\folder. Always verify that.claude\skills\is actually populated after this command. An install that “ran fine” but loaded nothing is the classic symptom.
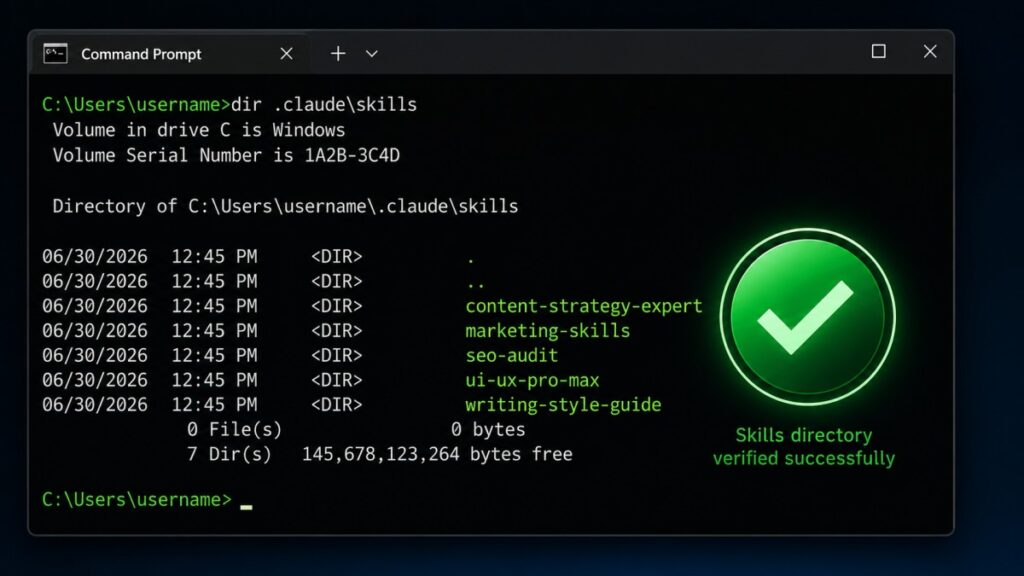
To verify, list the per-project skills folder (or the global one if you installed there):
dir .claude\skills
If it is empty, jump to the symlink fix in the troubleshooting section. One more note on this particular pack: it has gone through version updates that can leave stale folders behind. Updating means re-running the npx skills add command and then manually deleting any orphaned folders with old names, otherwise you end up with duplicate or outdated skill definitions competing for attention.
Method C: Installing a Skill via Its Own CLI
Some skills ship their own dedicated CLI installer. In my experience this is often the most reliable route on Windows, and it sometimes offers a native global flag that the generic methods do not. A good example is a UI/UX design-intelligence skill at github.com/nextlevelbuilder/ui-ux-pro-max-skill.
You install its CLI globally, then run the init command pointed at Claude with a global flag:
npm install -g ui-ux-pro-max-cli
uipro init --ai claude --global
The --global flag installs it into ~/.claude/skills/ (which on Windows is C:\Users\<username>\.claude\skills\), so it is available in every project.
⚠️ Heads-up: This skill requires Python 3.x because it runs a Python search script for its design-system engine. If you skipped the Python prerequisite earlier, go back and install it now, and remember to use
pythonrather thanpython3on Windows. This is also the repo where the/pluginmarketplace method tends to hit the “symbolic link” zip error, which is precisely why the dedicated CLI is the recommended path here.
The lesson generalizes: when a skill provides its own installer, try it first. The maintainer built it to handle exactly the platform quirks the generic tools stumble over.
Verifying Skills Loaded and Using Them
Never assume a skill install worked on Claude Code on Windows. After any skill install, run a directory listing against your global skills folder and confirm the skill folders actually appear:
dir C:\Users\<username>\.claude\skills
If the folders are there, open the Desktop Code tab, start a session in a relevant project, and make a request that should trigger the skill. For the UI/UX skill, asking for design or interface work should auto-activate it. Skills load based on the relevance of your request, so you do not invoke them by name; you simply ask for the kind of work the skill covers and Claude pulls it in.
Because the Code tab and the CLI share the same .claude\ config, installing through the CLI makes the skill appear in the GUI without any extra step. That shared-folder behavior is the whole reason this hybrid workflow is comfortable: manage in the CLI, work in the GUI.
Using Claude Code with Laragon for Local PHP
If you build PHP applications on Windows, Laragon is a fantastic local stack, and it pairs beautifully with Claude Code on Windows. The key insight is that both tools operate on the same project folder: C:\laragon\www\<project>\. Laragon runs the web server (Apache or Nginx plus PHP and MySQL); Claude Code edits the source files. They do not conflict because they are doing different jobs on the same files.
The development loop is fast and tight:
- Keep Laragon running in the background.
- Ask Claude Code to change something in your project.
- Review the diff Claude proposes before accepting it.
- Refresh your browser at the Laragon
.testURL to see the change live.
Because PHP is interpreted, there is no build step and no server restart. You just refresh the browser and the new code runs. That immediate feedback is what makes this combination so productive for WordPress work, custom PHP apps, or any Laragon-hosted project.
⚠️ Heads-up: Open one project per Code session (point Claude at
C:\laragon\www\my-project\, not the entireC:\laragon\www\directory). Pointing it at all ofwwwat once floods the context with unrelated sites and degrades the quality of its reasoning. Scope it to the single project you are actually working on.
Persistent Instructions with CLAUDE.md
You do not want to re-explain your stack and conventions in every session. That is what CLAUDE.md is for in Claude Code on Windows: a markdown file Claude Code automatically reads at the start of every session, treating it as standing instructions.
There is a hierarchy:
- A global file at
C:\Users\<username>\.claude\CLAUDE.mdapplies to every project. - A project file at
<project>\CLAUDE.md(or<project>\.claude\CLAUDE.md) applies to that project only. - On conflicts, the more specific (project) file wins.
Keep it under roughly 200 lines. Past that, instruction-following starts to degrade as the file competes with everything else in context. Good uses are your tech stack, naming and code conventions, and a git-workflow rule. Here is an example global CLAUDE.md to adapt:
# Global Instructions for Claude Code

## About me
I am a full-stack developer on Windows. I work mostly with PHP, WordPress,
and Laravel, plus the occasional Node.js service.

## Conventions
- Use clear, descriptive variable and function names.
- Match the existing code style of the file you are editing.
- Prefer small, focused changes over large rewrites.
- Add a short comment only where the intent is not obvious.

## Git workflow (important)
- Never commit directly to main.
- Always create a descriptive feature branch before committing.
- Show me the diff and wait for my confirmation before committing.
- Never run git push without asking first.

## Communication
- Explain what you changed and why, briefly.
- If you are unsure, ask one clear question before proceeding.
⚠️ Heads-up:
CLAUDE.mdis guidance, not hard enforcement. Claude will generally follow it, but it can still be talked or reasoned past. If you need a strict, non-negotiable lock (for example, truly preventing a commit to main), aPreToolUsehook is the stronger mechanism. TreatCLAUDE.mdas a reliable default, not an unbreakable rule.
Taming Approval Prompts with settings.json
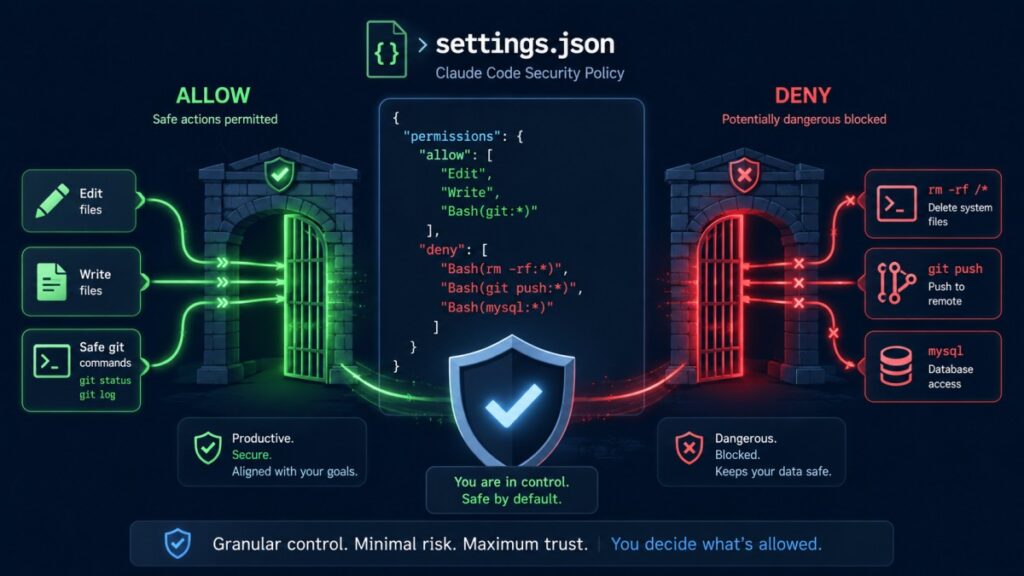
By default, Claude Code on Windows asks for approval before taking actions. That is the right default, but it gets noisy fast. The fix is not to disable approvals wholesale; it is to configure them sensibly. The settings.json file supports an allow list and a deny list, and the deny list overrides allow.
You have a spectrum of options. “Accept Edits” mode (cycle the modes with Shift+Tab) auto-approves file edits while still prompting for risky bash commands. A per-project settings.local.json can broadly allow Edit, Write, and Bash for that one project. Here is a sensible per-project example that allows routine work but explicitly denies the irreversible stuff:
{
  "permissions": {
    "allow": [
      "Edit",
      "Write",
      "Bash(npm run *)",
      "Bash(php *)",
      "Bash(git status)",
      "Bash(git diff *)",
      "Bash(git add *)",
      "Bash(git commit *)"
    ],
    "deny": [
      "Bash(rm -rf *)",
      "Bash(git push *)",
      "Bash(mysql *)",
      "Bash(mysqldump *)"
    ]
  }
}
I strongly advise keeping a deny list for irreversible actions like rm -rf, git push, and direct mysql or mysqldump commands, especially when the project has a live local database or deploy scripts. One wrong auto-approved command against a real database is a very bad afternoon.
⚠️ Heads-up: Fully unrestricted “bypass permissions” mode is dangerous and should never be set machine-wide. At most, scope it to a throwaway project where nothing matters. Also,
settings.local.jsonshould be gitignored so an allow-all rule never gets committed and silently inherited by a teammate (or by future-you on a more important repo).
Common Errors and Fixes
Here are the Claude Code on Windows gotchas I collected, gathered in one place so you can scan for your symptom.
| Symptom | Cause | Fix |
|---|---|---|
/plugin not recognized or “isn’t available in this environment” | You ran it in the Desktop Code tab or regular chat | Run it in the standalone CLI by typing claude in a terminal first |
.claude\skills\ is empty after install | Windows symlink creation failed silently | Enable Developer Mode and reinstall, or manually copy files from .agents\skills\ |
python3 not recognized | On Windows the command is python | Use python --version instead of python3 |
| A freshly installed command is “not recognized” | PATH was updated but the terminal was already open | Close and reopen the terminal, then retry |
“Zip file contains a symbolic link” during /plugin install | The repo uses internal symlinks Windows refuses to extract | Use that repo’s own dedicated CLI installer (Method C) instead |
The Windows symlink fix in detail
Several skill installers rely on symlinks, so this deserves a closer look. If a global skills folder ends up empty after an install, you have two fixes. The first is to enable Windows Developer Mode (Settings → For developers), which grants the permission needed to create symlinks, and then reinstall. The second is to manually copy the real files from the parallel .agents\skills\ folder into .claude\skills\.
⚠️ Heads-up: A manual copy works, but those copied files will not auto-update later when the source skill changes, because they are no longer linked to the original. If you go the manual route, remember to re-copy whenever you want the latest version.
FAQ: Claude Code Desktop on Windows
What is the difference between Claude Code and the regular Claude chat?
The regular Claude chat is conversational; you ask questions and copy code back and forth manually. Claude Code is agentic: it reads your project files, edits them directly, runs commands, and iterates on results. The regular chat cannot run slash commands like /plugin, while Claude Code (in the CLI) can.
Why does /plugin not work in the Desktop Code tab?
Interactive management commands like /plugin, /permissions, and /config are not available in the Desktop Code tab GUI; it returns “isn’t available in this environment.” These commands only run in the standalone Claude Code CLI. Since the CLI and the Code tab share the same .claude\ config folder, you can install skills via the CLI and they appear in the GUI.
Do I need the CLI if I only want to use the GUI?
Yes, in practice. The GUI handles your daily coding, but the moment you want to install or manage skills from the marketplace, you need the CLI because that is the only surface where /plugin works. Install both and use them together.
Why is my .claude\skills folder empty after a successful install?
On Windows, several installers create symlinks, and symlink creation can fail silently without Developer Mode enabled. The files often land in a parallel .agents\skills\ folder instead. Enable Developer Mode and reinstall, or manually copy the files from .agents\skills\ into .claude\skills\. Always verify the folder is populated after installing.
Should I install skills globally or per-project?
Install general-purpose skills (copywriting, design, SEO) globally in C:\Users\<username>\.claude\skills\ so they are available everywhere. Install project-specific skills in the project’s own .claude\skills\ folder so they can be committed to version control and shared with your team. The two scopes coexist.
Do I need to restart Laragon or rebuild after Claude Code edits a PHP file?
No. PHP is interpreted, so there is no build step and no server restart. Keep Laragon running, let Claude edit the file, then refresh your browser at the .test URL to see the change live immediately.
Does CLAUDE.md strictly enforce my rules?
No. CLAUDE.md is guidance that Claude reads at the start of each session and generally follows, but it is not hard enforcement and can be reasoned past. For a strict lock, such as truly preventing a commit to main, use a PreToolUse hook, which is a stronger mechanism than instructions alone.
Is it safe to turn off permission prompts entirely?
Not machine-wide. Fully unrestricted “bypass permissions” mode is dangerous and should never be set globally. At most, scope it to a throwaway project. Keep a deny list for irreversible actions like rm -rf, git push, and direct database commands, and gitignore your settings.local.json so an allow-all rule is never committed.
Conclusion and Next Steps
Setting up Claude Code on Windows is mostly a matter of knowing which command runs where and watching out for the Windows-specific symlink and PATH traps. Once the three surfaces click into place, the workflow is genuinely excellent: install skills through the CLI, do your real work in the Code tab, run local PHP projects on the same folder Laragon serves, and lock down the dangerous commands with a sensible deny list. Start with one skill, verify it loaded, write a short CLAUDE.md, and build from there.
If you hit a gotcha I did not cover, or you found a cleaner way around the symlink issue on Windows, drop it in the comments. I read them, and the best fixes usually come from other practitioners who broke something the same way I did.
Related reading:
- The Ultimate Claude AI Guide: Every Feature, Tip, and Prompt You Need
- Top 11 AI Coding Agents: The Complete Comparison Guide
- Best AI Models and Agents: Hands-On Pricing, Pros, Cons, and Comparison
- How to Host Node.js on cPanel: The Ultimate Guide
Sources: Anthropic Claude Code documentation (docs.claude.com/en/docs/claude-code), npm package registry (@anthropic-ai/claude-code), Node.js (nodejs.org), Git for Windows (git-scm.com), and Laragon (laragon.org). All commands and paths verified on Windows 11 as of this writing.

Husain Alhaboubi is Director of Digital Channels at Mobily, where he leads platform optimization, AI-powered customer engagement, and UI/UX strategy. With 20+ years of experience spanning eCommerce, IT infrastructure, and digital marketing, he previously drove a 225% revenue increase and 69% organic traffic growth as eCommerce Senior Manager at flyadeal, and managed enterprise IT operations — including data centers, ERP systems, and network security — as Group IT Manager at IPD Group.
Husain holds a BS in Information Systems from the University of Texas at Arlington and is certified in Google Ads, Google Analytics, and Semrush SEO. He writes from hands-on experience across both sides of digital business: the strategic (eCommerce, SEO, AI, digital transformation) and the technical (server administration, cloud computing, web development, networking, and security) — with a particular focus on the Saudi market and Vision 2030. Read his full resume →