

How to Host Node.js on cPanel: The Ultimate 2026 Guide
If you run a website on shared hosting, chances are you already know cPanel inside and out for managing PHP sites. But what happens when you need to host Node.js on cPanel?
Whether you are building a REST API, deploying an Express application, or running a real-time chat server alongside your WordPress site, the process can feel confusing at first. The good news is that modern cPanel versions include a built-in Node.js application manager powered by Phusion Passenger, making it far simpler to host Node.js on cPanel than most developers expect. In this definitive cPanel Node.js setup tutorial, I will walk you through every step — from initial setup to how to fix cPanel Node.js error 503 — so you can confidently use the cPanel application manager to deploy your Node app and get your JavaScript backend running on shared hosting.
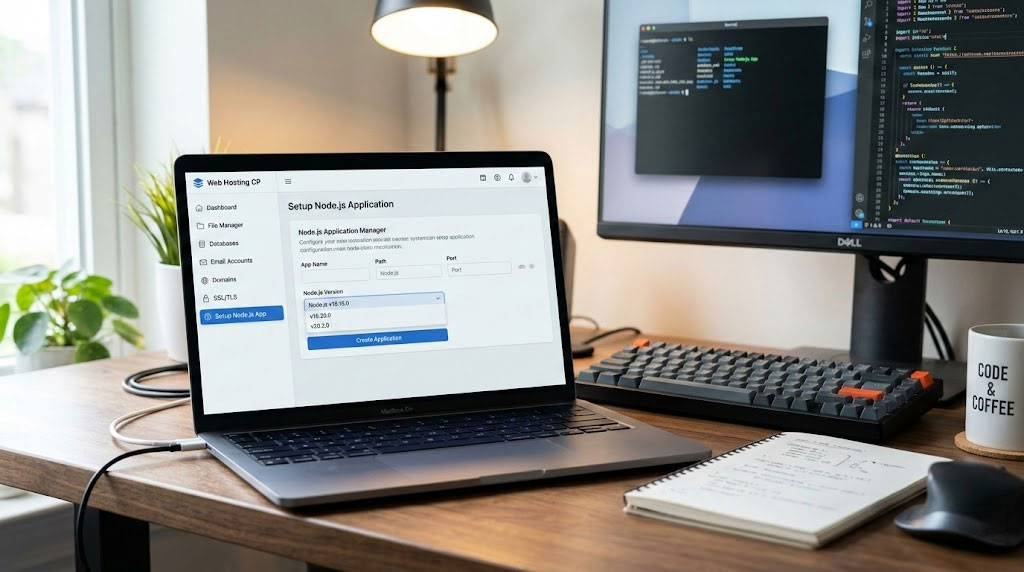
Table of Contents
Why Host Node.js on cPanel in 2026?
Node.js has cemented itself as the backbone of modern server-side JavaScript development. According to the Stack Overflow Developer Survey 2024, approximately 40.8% of developers worldwide use Node.js, making it the most popular web technology ahead of React.js. Meanwhile, Node.js now powers over 30 million websites globally, with its market share rising from 3.1% to 4.6% according to W3Techs (2025). The demand to host Node.js on cPanel continues to grow as companies like Netflix, PayPal, LinkedIn, and Walmart rely on it for scalable, high-performance backends.

At the same time, cPanel remains the dominant hosting control panel with over 93% market share in its category (6sense, 2025). Millions of website owners and developers use cPanel daily to manage their PHP-based sites, email, databases, and file systems. The overlap between these two technologies creates a real challenge: how do you host Node.js on cPanel without migrating to an expensive VPS or cloud platform? The answer is surprisingly accessible, and this cPanel Node.js setup tutorial will prove it.
The answer lies in cPanel’s built-in Setup Node.js App feature. Powered by CloudLinux’s Node.js Selector and Phusion Passenger, this tool lets you host Node.js on cPanel directly from the graphical interface — no root access or complex server configuration required. Whether you want to deploy a node app using the cPanel application manager or manage dependencies via SSH, the platform covers both workflows. Here is why this matters for you:
- Cost efficiency: Shared hosting plans with Node.js support start at a fraction of the price of a dedicated VPS, making it ideal for small projects, MVPs, and side projects.
- Familiar interface: If you already manage WordPress sites on cPanel, deploying a Node.js app uses the same dashboard you know.
- Coexistence with PHP: You can run Node.js applications alongside WordPress, Laravel, or any PHP application on the same hosting account.
- Simplified dependency management: The cPanel Node.js interface handles virtual environments, NPM package installation, and application restarts through a graphical UI.
Prerequisites Before You Start
Before you can host Node.js on cPanel, you need to verify a few things. Not every hosting plan supports Node.js, and skipping this check is one of the most common mistakes beginners make. Getting these prerequisites right is the first step in any successful cPanel Node.js setup tutorial.
Hosting plan requirements:
- Your hosting provider must offer the Setup Node.js App feature in cPanel. This is typically available on plans running CloudLinux OS with the Node.js Selector module, or on newer cPanel versions with the Application Manager.
- Check under the Software section of your cPanel dashboard. If you see “Setup Node.js App” or “Node.js App,” you are good to go. If the icon is missing, contact your hosting provider to confirm Node.js support.
- Some providers restrict Node.js to higher-tier shared hosting plans (e.g., InMotion Hosting limits it to Power and Pro plans).
Technical requirements:
- A working Node.js application on your local machine with a valid
package.jsonfile. - SSH access (recommended but not strictly required — the cPanel Terminal tool works as an alternative).
- A startup file, typically
app.jsorserver.js, that initializes your application. - Basic understanding of NPM and how Node.js handles dependencies.
Supported Node.js versions: Most cPanel hosting providers support Node.js versions ranging from 10 to 22+, with Node.js 20 LTS being the recommended choice for production applications in 2026. Some providers like LWS support versions 6 through 24. Always select a version that matches your application’s requirements as specified in the engines field of your package.json. Selecting the wrong version is one of the top reasons developers encounter errors when they try to host Node.js on cPanel for the first time.
cPanel Node.js Setup Tutorial: Step-by-Step
This is the core of the guide. I will walk you through the entire process of deploying a Node.js application using this cPanel Node.js setup tutorial approach — from creating the application in cPanel to running it live on your domain. Follow these six steps to successfully host Node.js on cPanel on any shared hosting plan that supports the feature.
Step 1: Access the Setup Node.js App Feature
Log in to your cPanel account. Navigate to the Software section (in the Jupiter theme, look under the Tools page). Click on Setup Node.js App. You will see the Node.js Selector page, which lists any existing applications and provides a CREATE APPLICATION button in the upper right corner. This is your gateway to host Node.js on cPanel through the graphical interface.
If you are using the Paper Lantern theme, the icon appears in the SOFTWARE section with the same name. Click it to access the same interface.
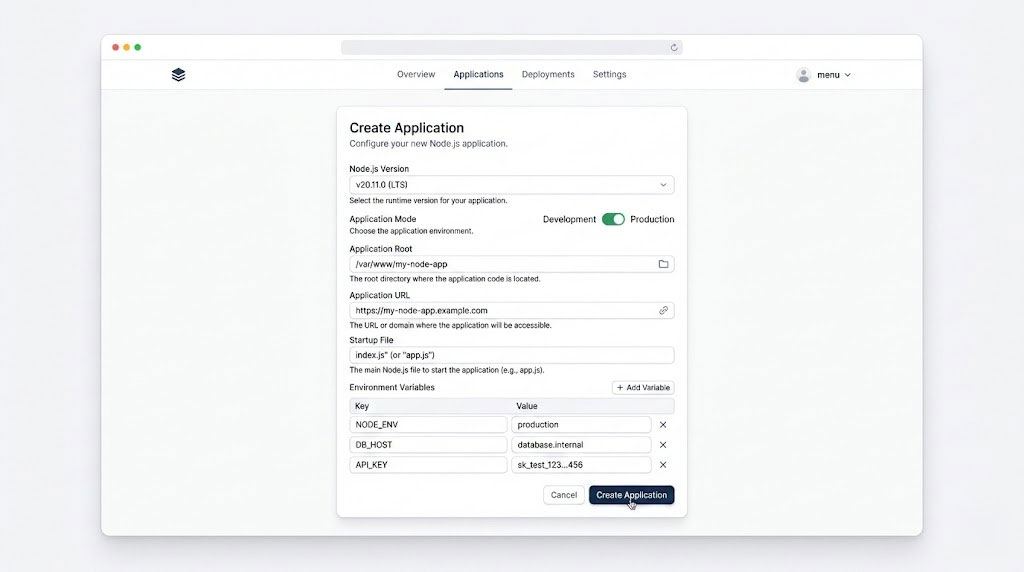
Step 2: Configure Your Application Settings
Click CREATE APPLICATION and fill in the following fields. Getting these settings right is essential for a successful deployment when you host Node.js on cPanel:
| Field | Description | Example Value |
|---|---|---|
| Node.js version | Select the version that matches your app’s requirements. Use Node.js 20 LTS for stability. | 20 |
| Application mode | Choose Development for testing or Production for live deployment. This sets the NODE_ENV environment variable automatically. | Production |
| Application root | The directory where your app files will live, relative to /home/username/. Do not place this inside public_html. | myapp |
| Application URL | The URL where the app will be accessible. Choose your domain or a subdomain. | app.yourdomain.com |
| Application startup file | The main entry point for your application. If left blank, cPanel defaults to app.js. | app.js |
Critical tip: Never set the application root directory inside your domain’s public_html folder. The application root should be something like /home/username/myapp or /home/username/apps/myapp. Placing it inside the document root can expose your source code and node_modules to the public web — a serious security risk. This is the single most important configuration detail when you host Node.js on cPanel.
Step 3: Upload Your Application Files
After creating the application, you need to upload your project files to the application root directory. This is where many developers who are learning to host Node.js on cPanel for the first time get confused — you have several options depending on your workflow:
Option A: Using cPanel File Manager
- On your local machine, zip your project files (excluding the
node_modulesfolder). - Open File Manager in cPanel and navigate to your application root directory (e.g.,
/home/username/myapp). - Click Upload, select your zip file, and upload it.
- After uploading, right-click the zip file and select Extract.
- Ensure all files are directly inside the application root, not in a nested subfolder.
Option B: Using Git Version Control
cPanel includes a built-in Git Version Control feature, which is the preferred method when you regularly host Node.js on cPanel for ongoing projects. You can clone your repository directly into the application root, pull updates without re-uploading files, and maintain version history. Navigate to Git Version Control in cPanel, click Create, enter your repository URL, and set the repository path to your application root directory.
Option C: Using FTP/SFTP
If you prefer using an FTP client like FileZilla, connect to your server and upload files directly to the application root. Remember to exclude the node_modules directory — dependencies will be installed on the server in the next step.
Step 4: Install Dependencies with NPM
Once your files are uploaded (including package.json), you need to install the project dependencies. This is a critical step whenever you host Node.js on cPanel — without running npm install, your application will crash immediately. cPanel offers two methods:
Method 1: Using the cPanel Interface (Easiest)
Go back to Setup Node.js App, find your application in the list, and click the pencil icon to edit. You will see a Run NPM Install button. Click it, and cPanel will execute npm install inside your application’s virtual environment, installing all dependencies listed in package.json.
Method 2: Using SSH/Terminal
For more control, use the cPanel Terminal or connect via SSH. First, activate the Node.js virtual environment by copying the source command shown in the Setup Node.js App interface. It will look something like this:
source /home/username/nodevenv/myapp/20/bin/activate && cd /home/username/myapp
After running this command, your terminal prompt will change to indicate you are inside the virtual environment. Now run:
npm install
If you encounter memory issues during installation (common on shared hosting with limited resources), you can limit NPM’s memory usage:
NODE_OPTIONS='--max-old-space-size=512' npm install
Step 5: Set Environment Variables
Environment variables are essential for storing sensitive configuration data like API keys, database credentials, and application secrets. When you host Node.js on cPanel and need to deploy a node app using the cPanel application manager, you can set these directly in the interface.
In the Setup Node.js App editor, scroll down to the Environment Variables section. Click Add Variable and enter your key-value pairs:
| Variable Name | Example Value | Purpose |
|---|---|---|
| DB_HOST | localhost | MySQL database host |
| DB_USER | cpaneluser_dbuser | Database username (cPanel prefix required) |
| DB_PASS | your_secure_password | Database password |
| DB_NAME | cpaneluser_mydb | Database name (cPanel prefix required) |
| JWT_SECRET | your_jwt_secret_key | Authentication token secret |
| PORT | 3000 | Application port (note: Passenger overrides this) |
These variables are accessible in your application code through process.env.VARIABLE_NAME. Note that cPanel automatically sets NODE_ENV based on the application mode you selected (Development or Production).
Important: Do not upload a .env file as your primary method for environment variables on cPanel. While the dotenv package works, using cPanel’s built-in environment variable interface is more secure and ensures variables are properly injected into the Phusion Passenger environment. Properly managing environment variables is essential when you deploy a node app using the cPanel application manager.
Step 6: Start and Test Your Application
After setting up everything, click Save in the Node.js App editor, then click Start Application (or Restart if it is already running). cPanel will launch your application through Phusion Passenger. This is the moment of truth in your effort to host Node.js on cPanel.
Click the Open button next to your application URL. If everything is configured correctly, you should see your application running live. For a fresh application that has not been customized, cPanel displays an “It Works!” message.
If you see an error instead, do not panic — jump to the troubleshooting section below for solutions to common issues.
Deploying an Express.js App on cPanel: A Practical Example
Let me walk you through a practical example of deploying an Express.js application. This is the most common use case when developers want to deploy a node app using the cPanel application manager. If you have completed the cPanel Node.js setup tutorial above, you already have the foundation — now it is time to apply it to a real-world Express project.
Step 1: Create your project locally
Start with a minimal Express application. Create a new directory and initialize it:
mkdir my-express-app
cd my-express-app
npm init -y
npm install express
Step 2: Create your startup file (app.js)
Here is a basic Express application configured for cPanel deployment:
const express = require('express');
const app = express();
const port = process.env.PORT || 3000;

app.get('/', (req, res) => {
  res.send('Hello from Express on cPanel!');
});

app.get('/api/status', (req, res) => {
  res.json({
    status: 'running',
    environment: process.env.NODE_ENV,
    timestamp: new Date().toISOString()
  });
});

app.listen(port, () => {
  console.log(`Server running on port ${port}`);
});
Key point about port binding: You might notice I am using process.env.PORT || 3000. When you host Node.js on cPanel, Phusion Passenger overrides whatever port you specify and uses its own reverse proxy mechanism. However, including process.env.PORT as a fallback is still best practice — it ensures compatibility both locally and on the server.
Step 3: Verify your package.json
Make sure your package.json includes the correct start script and engine specification:
{
  "name": "my-express-app",
  "version": "1.0.0",
  "main": "app.js",
  "scripts": {
    "start": "node app.js"
  },
  "engines": {
    "node": ">=18.0.0"
  },
  "dependencies": {
    "express": "^4.21.0"
  }
}
Step 4: Upload and deploy
Zip everything except node_modules, upload to your application root via File Manager, extract, run NPM Install from the cPanel interface, and start the application. Your Express app should now be accessible at the Application URL you configured. Congratulations — you have just used the cPanel Node.js setup tutorial to deploy a node app using the cPanel application manager with Express.
How Phusion Passenger Works Behind the Scenes
Understanding how cPanel runs your Node.js application under the hood is critical for effective debugging. When you host Node.js on cPanel, your application does not run as a standalone process on a port of your choosing. Instead, it is managed by Phusion Passenger, an application server that integrates with Apache. Knowing this architecture is essential for troubleshooting issues, especially if you need to fix cPanel Node.js error 503 problems.
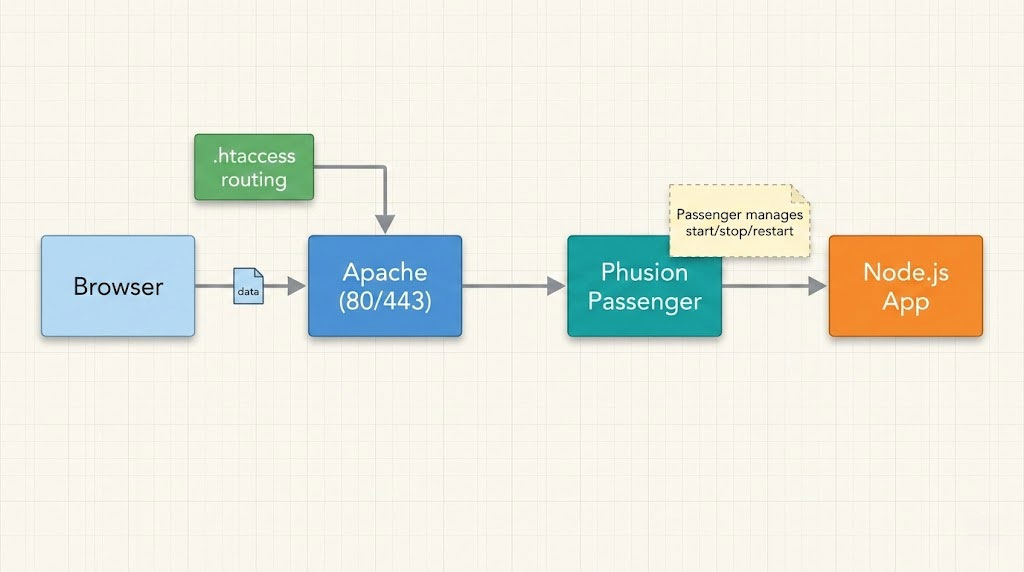
Here is what happens when a request reaches your Node.js application on cPanel:
- Apache receives the HTTP request on port 80/443.
- .htaccess routing: When you create a Node.js application in cPanel, it automatically generates an
.htaccessfile in the Application URL directory that redirects requests to Phusion Passenger. - Passenger manages your Node.js process: It starts your application, handles process lifecycle (start, stop, restart), and performs load balancing if multiple processes are running.
- Reverse port binding: Passenger ignores whatever port you specify in your code (e.g.,
app.listen(3000)) and instead uses its own internal mechanism to bind your application. This means you do not need to worry about port conflicts with other applications on the same server. - Response buffering: Passenger buffers responses between your Node.js app and the client, protecting your application from slow connections that could tie up resources.
This architecture is fundamentally different from running Node.js on a VPS with tools like PM2 or running node app.js directly. When you host Node.js on cPanel, you cannot use process managers like PM2 or forever because Passenger already fulfills that role. Commands like npm run start, node server.js, or pm2 start myapp will not work for serving your application — Passenger handles execution automatically.
Managing Your Node.js App with the cPanel Application Manager
Once your application is running, cPanel provides several management actions through the Node.js Selector interface. Knowing how to deploy a node app using the cPanel application manager also means understanding ongoing management tasks:
- Stop/Start/Restart: Use the action buttons beside your application in the Node.js App list. Restarting is necessary after code changes, dependency updates, or environment variable modifications.
- Edit configuration: Click the pencil icon to change the Node.js version, application mode, startup file, or environment variables.
- Run NPM Install: Re-install dependencies after updating
package.json. - Run custom scripts: Some cPanel versions allow running NPM scripts defined in your
package.json. - Unregister application: Removes the application from cPanel’s management but does not delete your files. You can manually remove files through File Manager afterwards.
Restarting via SSH: If you prefer the command line when you host Node.js on cPanel, you can force a restart by creating or touching a restart.txt file inside the tmp directory of your application root:
mkdir -p /home/username/myapp/tmp
touch /home/username/myapp/tmp/restart.txt
Phusion Passenger monitors this file’s timestamp. When it detects a change, it performs a graceful restart of your application.
Connecting Your Node.js App to a MySQL Database on cPanel
Most real-world Node.js applications need a database. When you host Node.js on cPanel, connecting to MySQL is straightforward because cPanel makes it easy to create databases and manage users from the same dashboard.
Step 1: Create the database and user
In cPanel, navigate to MySQL Databases. Create a new database (e.g., mydb) and a new user with a strong password. Add the user to the database with ALL PRIVILEGES. Note that cPanel prefixes both the database and user names with your cPanel username (e.g., cpaneluser_mydb and cpaneluser_dbuser).
Step 2: Install the MySQL package
Add the mysql2 package to your project. Using SSH or the cPanel terminal with your virtual environment activated:
npm install mysql2
Step 3: Configure the database connection
Use environment variables (set via the cPanel interface as described earlier) for your database credentials:
const mysql = require('mysql2/promise');

const pool = mysql.createPool({
  host: process.env.DB_HOST || 'localhost',
  user: process.env.DB_USER,
  password: process.env.DB_PASS,
  database: process.env.DB_NAME,
  waitForConnections: true,
  connectionLimit: 10,
  queueLimit: 0
});

// Example usage in an Express route
app.get('/api/users', async (req, res) => {
  try {
    const [rows] = await pool.query('SELECT * FROM users LIMIT 10');
    res.json(rows);
  } catch (error) {
    console.error('Database error:', error);
    res.status(500).json({ error: 'Database connection failed' });
  }
});
Always use connection pooling (as shown above) rather than creating individual connections. Shared hosting environments have limited database connections, and pooling ensures efficient resource usage. This approach is critical for performance when you host Node.js on cPanel shared hosting where resources are shared across multiple accounts.
Fix cPanel Node.js Error 503 and Other Common Issues
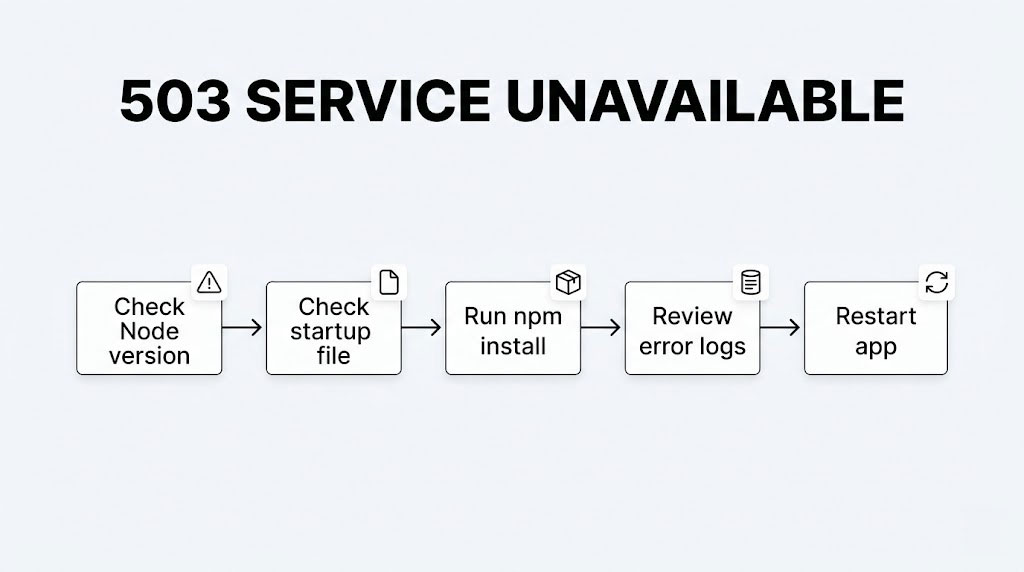
The dreaded 503 Service Unavailable error is the most common problem developers face when trying to host Node.js on cPanel. Learning how to fix cPanel Node.js error 503 is essential for any developer working with the platform. Here is a systematic guide to diagnosing and resolving it, along with other frequent issues.
503 Service Unavailable: Causes and Fixes
| Cause | Solution |
|---|---|
| Node.js version mismatch | Ensure the Node.js version selected in cPanel matches your app’s requirements. If your app was built with Node 20, do not run it on Node 16. Update the version in Setup Node.js App. |
| Missing or incorrect startup file | Verify the startup file path is correct (e.g., app.js not src/app.js unless your root is set accordingly). Confirm the file exists in the application root. |
| Dependencies not installed | Click Run NPM Install in the cPanel interface. If it fails, try installing via SSH with memory limits: NODE_OPTIONS='--max-old-space-size=512' npm install |
| Application crash on startup | Check the Apache error log in cPanel (Metrics > Errors) for stack traces. Common causes include missing modules, syntax errors, or uncaught exceptions. |
| Resource limits exceeded | Shared hosting accounts have CPU and RAM limits. Check Resource Usage in cPanel. If your app exceeds limits, the server kills the process and returns a 503. |
| Hardcoded port binding | If your code uses app.listen(3000) without process.env.PORT, Passenger should still work (it overrides ports). However, some configurations may conflict. Use process.env.PORT || 3000 for safety. |
| Corrupted .htaccess file | The cPanel-generated .htaccess in your Application URL directory controls Passenger routing. If it is manually modified or corrupted, delete it and restart the app — cPanel will regenerate it. |
| Phusion Passenger not installed | If you see “Apache Passenger is required by Node.js Selector,” contact your hosting provider. They need to install ea-ruby27-mod_passenger and the alt-nodejs packages on the server. |
Other Common Errors and Solutions
“Application root already in use”: This occurs when you try to set an application root that is already assigned to another Node.js, Python, or Ruby application. Check for conflicting applications in the Setup Node.js App list, or inspect the .htaccess file in the target directory for Passenger directives from a previous setup. Resolving this conflict is important before you can successfully host Node.js on cPanel on that specific directory.
“Cannot find module” errors: Run npm install inside the virtual environment. If specific modules fail, check that your Node.js version supports them. Some native modules (like bcrypt) require compilation tools that may not be available on shared hosting — use pure JavaScript alternatives like bcryptjs instead. This is a frequent issue that can also fix cPanel Node.js error 503 when missing dependencies are the root cause.
Application runs but shows blank page: Check that your Express routes are correctly defined and that you are not accidentally serving static files from the wrong directory. When you host Node.js on cPanel, the Application URL must match your route definitions — Passenger maps incoming requests through the URL you configured during setup.
Changes not reflected after code update: Passenger caches your application. After modifying code, you must restart the app from the cPanel interface or touch the tmp/restart.txt file. This is a common stumbling block when developers first learn to host Node.js on cPanel — unlike local development, code changes do not apply automatically.
Node.js on cPanel vs. VPS: Which Should You Choose?
Understanding the tradeoffs helps you make the right hosting decision for your specific situation. Before you commit to host Node.js on cPanel shared hosting, compare it honestly against a VPS deployment:
| Feature | cPanel Shared Hosting | VPS / Cloud (e.g., AWS EC2) |
|---|---|---|
| Cost | $3–$15/month | $5–$50+/month |
| Setup complexity | Low — graphical interface | High — requires server administration skills |
| Root access | No | Yes |
| Process managers | Phusion Passenger only (no PM2) | PM2, forever, systemd, Docker |
| Node.js version control | Limited to provider’s installed versions | Full control with NVM |
| Resource limits | Shared CPU/RAM, strict limits | Dedicated resources, scalable |
| WebSocket support | Limited or unsupported | Full support |
| Custom server config | Limited to .htaccess | Full Nginx/Apache configuration |
| SSL/HTTPS | Usually included via Let’s Encrypt | Manual setup required |
| Best for | Small projects, APIs, MVPs, side projects | Production apps, high-traffic, real-time apps |
My recommendation: Host Node.js on cPanel shared hosting when you need to deploy a small to medium Node.js application alongside existing PHP sites, or when you want minimal server management overhead. Switch to a VPS or cloud platform like AWS EC2 when you need WebSocket support, higher resource limits, custom server configurations, or when your application demands consistent performance under heavy load.
Security Best Practices for Node.js on Shared Hosting
Running Node.js on shared hosting introduces specific security considerations. When you host Node.js on cPanel, your application shares server resources with other accounts, making security best practices even more important. Follow these guidelines to protect your application:
- Keep the application root outside
public_html: This prevents direct access to your source code, configuration files, andnode_modules. - Use environment variables for secrets: Never hardcode API keys, database passwords, or JWT secrets in your source code. Use cPanel’s built-in environment variable interface.
- Keep Node.js and dependencies updated: Regularly update your Node.js version and run
npm auditto check for known vulnerabilities. Usenpm audit fixto automatically patch non-breaking security issues. - Enable HTTPS: Use cPanel’s SSL/TLS feature or AutoSSL to install a free Let’s Encrypt certificate. Force HTTPS by adding redirect rules to your
.htaccessfile or handling it in your Express middleware. - Set security headers: Use the
helmetpackage in Express to set HTTP security headers like Content-Security-Policy, X-Frame-Options, and X-Content-Type-Options. - Limit incoming request size: Use Express middleware like
express.json({ limit: '10kb' })to prevent large payload attacks that could exhaust shared hosting resources. - Do not expose stack traces: Set your application mode to Production so that error stack traces are not sent to the client.
const helmet = require('helmet');
const express = require('express');
const app = express();

// Security middleware
app.use(helmet());
app.use(express.json({ limit: '10kb' }));
app.use(express.urlencoded({ extended: true, limit: '10kb' }));

// Production error handler - no stack traces leaked
app.use((err, req, res, next) => {
  console.error(err.stack);
  res.status(500).json({
    error: process.env.NODE_ENV === 'production'
      ? 'Internal server error'
      : err.message
  });
});
For a deeper dive into protecting your web infrastructure, check out my guide on setting up a private VPN on AWS for secure remote server access.
FAQ: Host Node.js on cPanel
Can I run Node.js on shared hosting with cPanel?
Yes, many shared hosting providers that use cPanel now support Node.js through the Setup Node.js App feature or the Application Manager. You can host Node.js on cPanel shared hosting as long as your hosting provider has installed CloudLinux with the Node.js Selector module or the Phusion Passenger application server. Check for the “Setup Node.js App” icon under the Software section of your cPanel dashboard. If it is not there, contact your provider to ask if Node.js support is available on your plan or consider upgrading to a plan that includes it.
Which Node.js version should I use on cPanel?
For production applications in 2026, I recommend Node.js 20 LTS (Long Term Support) when you host Node.js on cPanel. LTS versions receive security patches and bug fixes for 30 months, making them the safest choice for stable deployments. Avoid using odd-numbered versions (like Node 21 or 23) on production systems, as these are current releases with shorter support windows. Always check your application’s package.json engines field and your framework’s documentation for minimum version requirements.
Can I use PM2 or other process managers on cPanel?
No. When you host Node.js on cPanel shared hosting, Phusion Passenger serves as the process manager for your Node.js applications. You cannot use PM2, forever, nodemon, or any other external process manager because Passenger handles starting, stopping, restarting, and monitoring your application processes. Attempting to use PM2 alongside Passenger will cause conflicts and errors.
How do I fix the 503 error when deploying Node.js on cPanel?
The 503 Service Unavailable error typically indicates that your application failed to start. To fix cPanel Node.js error 503, start by checking the Apache error log in cPanel (Metrics > Errors) for specific error messages. The most common causes are a Node.js version mismatch, missing dependencies (run NPM Install), an incorrect startup file path, or a syntax error in your code. If your app works locally but fails on cPanel, check for hardcoded file paths, missing environment variables, or native Node modules that require compilation tools not available on shared hosting.
Can I run a Node.js application alongside WordPress on the same cPanel account?
Absolutely. This is one of the biggest advantages when you host Node.js on cPanel. Your WordPress site runs on PHP through Apache as usual, while your Node.js application runs through Phusion Passenger on a different URL path or subdomain. For example, your WordPress site can serve yourdomain.com while your Node.js API runs on api.yourdomain.com or yourdomain.com/app. Both applications share the same cPanel account, database server, and file system.
Does cPanel Node.js hosting support WebSockets?
WebSocket support when you host Node.js on cPanel shared hosting is limited and often unreliable. Phusion Passenger and Apache do not natively handle WebSocket upgrade requests as well as Nginx or direct Node.js servers do. If your application requires real-time features like chat or live notifications using Socket.io or native WebSockets, I recommend using a VPS or cloud hosting where you have full control over the web server configuration. For shared hosting, consider using long-polling as a fallback or offloading real-time features to a dedicated service like Pusher or Firebase.
Can I deploy a Next.js or Nuxt.js application on cPanel?
Deploying SSR (Server-Side Rendered) frameworks like Next.js when you host Node.js on cPanel is technically possible but challenging. The build process for these frameworks is resource-intensive, and the resulting application often exceeds shared hosting resource limits. If you need to deploy Next.js, build the application locally (run next build), upload the built files, and configure the startup file to point to your server entry. However, for Next.js applications of any significant complexity, a VPS or platform like Vercel is a much better fit.
How do I debug a Node.js application on cPanel?
Debugging when you host Node.js on cPanel requires checking the Apache error logs, which capture STDOUT and STDERR from your Node.js application. In cPanel, go to Metrics > Errors to view recent log entries. For more detailed logging, add console.log() statements in your code and use a logging library like winston or pino that writes to a log file in your application directory. You can then view these logs through File Manager or SSH. If you have set a custom PassengerLogFile in your .htaccess, Passenger-related errors and application output are directed to that file instead.
Start Hosting Node.js on cPanel Today
Deploying Node.js applications on cPanel does not have to be intimidating. With the built-in Setup Node.js App feature, Phusion Passenger handling process management, and the familiar cPanel interface for managing files, databases, and environment variables, you have everything you need to host Node.js on cPanel shared hosting. The key steps are straightforward: create the application, upload your files, install dependencies, set environment variables, and start. This cPanel Node.js setup tutorial covered every step of that process along with practical code examples, database connectivity, and how to fix cPanel Node.js error 503 when things go wrong.
For small to medium projects, APIs, and prototypes, cPanel shared hosting offers an affordable and manageable way to host Node.js on cPanel without the overhead of server administration. Whether you need to deploy a node app using the cPanel application manager for a client project or spin up a quick API for a personal side project, this approach scales well for applications with moderate traffic. As your application grows and demands more resources, real-time features, or custom configurations, you can always migrate to a VPS or cloud platform like AWS EC2.
Start with the step-by-step cPanel Node.js setup tutorial in this guide, follow the security best practices, and refer to the troubleshooting table when issues arise. You will be surprised at how quickly you can go from a local development environment to a live Node.js application accessible to the world. If you need to deploy a node app using the cPanel application manager today, you now have every tool and technique to do it right.
Related reading:
- Cloudflare Origin Certificate on cPanel
- Fix Failed to Retrieve Directory Listing in FileZilla
- How to Extend EBS Volume on AWS EC2 Without Downtime
- How to Create and Reset Key Pair in Ubuntu: A Step-by-Step Guide
- How to Set Up a Private VPN on AWS: Ultimate Complete 2026 Guide
Sources: Stack Overflow Developer Survey 2024, W3Techs Node.js Usage Statistics 2025, 6sense cPanel Market Share 2025, cPanel Official Blog, Phusion Passenger Documentation, Node.js Official Documentation.

Husain Alhaboubi is Director of Digital Channels at Mobily, where he leads platform optimization, AI-powered customer engagement, and UI/UX strategy. With 20+ years of experience spanning eCommerce, IT infrastructure, and digital marketing, he previously drove a 225% revenue increase and 69% organic traffic growth as eCommerce Senior Manager at flyadeal, and managed enterprise IT operations — including data centers, ERP systems, and network security — as Group IT Manager at IPD Group.
Husain holds a BS in Information Systems from the University of Texas at Arlington and is certified in Google Ads, Google Analytics, and Semrush SEO. He writes from hands-on experience across both sides of digital business: the strategic (eCommerce, SEO, AI, digital transformation) and the technical (server administration, cloud computing, web development, networking, and security) — with a particular focus on the Saudi market and Vision 2030. Read his full resume →