

Cloudflare Origin Certificate
Installing a Cloudflare Origin Certificate in cPanel is one of the smartest moves you can make for website security. With over 88% of websites now using HTTPS and Google encrypting 96% of its search traffic, end-to-end encryption is no longer optional—it’s expected. The problem? Many site owners run into AutoSSL conflicts, 525/526 errors, and confusion about which SSL mode to use. In this guide, I’ll walk you through exactly how to generate, install, and configure a Cloudflare Origin Certificate on your cPanel server to achieve Full (Strict) SSL encryption without the headaches.
Table of Contents
What is a Cloudflare Origin Certificate?
A Cloudflare Origin Certificate is a free SSL/TLS certificate issued by Cloudflare specifically designed to encrypt traffic between Cloudflare’s edge servers and your origin web server. Unlike publicly trusted certificates from authorities like Let’s Encrypt or DigiCert, Origin Certificates are trusted only by Cloudflare—meaning they work exclusively when your traffic is proxied through Cloudflare’s network.
The key advantage? These certificates can be issued with validity periods of up to 15 years, eliminating the renewal headaches that come with 90-day Let’s Encrypt certificates. As of January 2025, there are over 305 million SSL certificates active on the internet, and Cloudflare Origin Certificates have become a popular choice for site owners who want hassle-free, long-term encryption without paying for premium certificates.
When you install a Cloudflare Origin Certificate in cPanel, you’re establishing what’s called “authenticated origin pulls”—a secure handshake that verifies traffic genuinely comes from Cloudflare rather than malicious sources attempting to bypass your security measures.
Cloudflare Origin Certificate vs. Let’s Encrypt: Which Should You Use?
Both options provide encryption, but they serve different purposes. Let’s Encrypt certificates are publicly trusted and work regardless of whether you use Cloudflare. Cloudflare Origin Certificates are designed specifically for the Cloudflare ecosystem and offer distinct advantages when you’re committed to using Cloudflare’s proxy.
| Feature | Cloudflare Origin Certificate | Let’s Encrypt |
|---|---|---|
| Certificate Validity | Up to 15 years | 90 days |
| Cost | Free | Free |
| Auto-Renewal Required | No (with long validity) | Yes (every 60-90 days) |
| Works Without Cloudflare | No | Yes |
| Publicly Trusted | No (Cloudflare only) | Yes |
| AutoSSL Conflicts | Possible (requires configuration) | Minimal |
| Best For | Cloudflare-proxied sites | Any website |
If you’re using Cloudflare and plan to keep using it long-term, the Origin Certificate is the better choice—you set it once and forget about renewals for years. However, if you might disable Cloudflare’s proxy at any point, stick with Let’s Encrypt or another publicly trusted certificate. When working with cloud infrastructure and security configurations, choosing the right SSL approach depends heavily on your specific architecture.
Understanding Cloudflare SSL/TLS Encryption Modes
Before installing your Cloudflare Origin Certificate, you need to understand Cloudflare’s encryption modes. Choosing the wrong mode is the most common cause of SSL errors 525 and 526. As of October 2024, Cloudflare introduced “Automatic SSL/TLS” which intelligently selects the best mode for your configuration, but understanding the manual options remains essential.
| Mode | Browser to Cloudflare | Cloudflare to Origin | Certificate Validation | Security Level |
|---|---|---|---|---|
| Off | HTTP | HTTP | None | None |
| Flexible | HTTPS | HTTP | None | Low (NOT recommended) |
| Full | HTTPS | HTTPS | No validation | Medium |
| Full (Strict) | HTTPS | HTTPS | Validates certificate | High (Recommended) |
Full (Strict) is the recommended setting when using a Cloudflare Origin Certificate. This mode encrypts traffic in both directions and validates that your origin server presents a legitimate certificate—either from a public CA or from Cloudflare’s Origin CA. Using Flexible mode leaves the connection between Cloudflare and your server completely unencrypted, which defeats the purpose of SSL entirely and can expose sensitive data to man-in-the-middle attacks.
Prerequisites Before Installation
Before you begin installing a Cloudflare Origin Certificate in cPanel, ensure you have the following ready:
- A Cloudflare account with your domain added and active
- DNS records pointing to Cloudflare (orange cloud icon enabled for proxy)
- cPanel access with SSL/TLS management permissions
- Your domain’s DNS fully propagated through Cloudflare
- Port 443 open on your server’s firewall
Important note for cPanel users: Cloudflare’s documentation explicitly states that you should use the RSA certificate format (not ECC) when working with Apache cPanel. The ECC format causes compatibility issues with Apache-based cPanel installations. I’ll specify this in the steps below.
Step-by-Step: Installing Cloudflare Origin Certificate in cPanel
Now let’s walk through the complete process of generating and installing your Cloudflare Origin Certificate on a cPanel server. I’ve broken this down into clear steps with screenshots and verification commands.
Step 1: Generate the Origin Certificate in Cloudflare
First, you’ll create the certificate in your Cloudflare dashboard:
- Log into your Cloudflare dashboard
- Select your domain from the list
- Navigate to SSL/TLS → Origin Server in the left sidebar
- Click Create Certificate
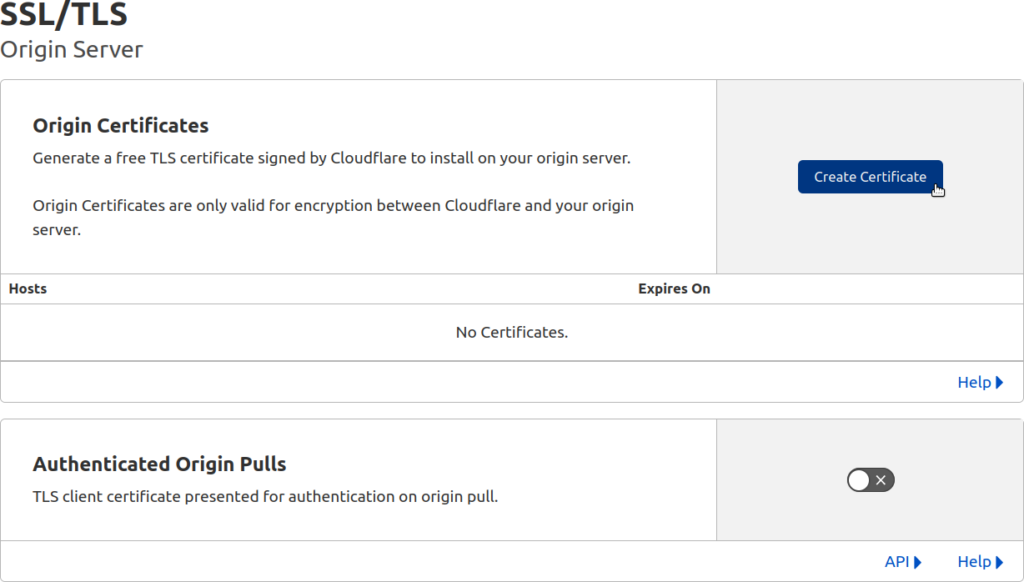
On the certificate creation screen, configure these settings:
- Generate private key and CSR with Cloudflare: Leave this selected (recommended)
- Private key type: Select RSA (2048) for cPanel compatibility
- Hostnames: By default, Cloudflare includes your root domain (example.com) and wildcard (*.example.com). Add any additional subdomains if needed
- Certificate Validity: Select 15 years for maximum convenience

Click Create. Cloudflare will generate two pieces of information:
- Origin Certificate: The public certificate (starts with —–BEGIN CERTIFICATE—–)
- Private Key: Your secret key (starts with —–BEGIN PRIVATE KEY—–)
Critical: Copy both the certificate and private key immediately and save them to separate text files on your local computer. The private key is shown only once—you cannot retrieve it later. Store these files securely; anyone with your private key can impersonate your server.
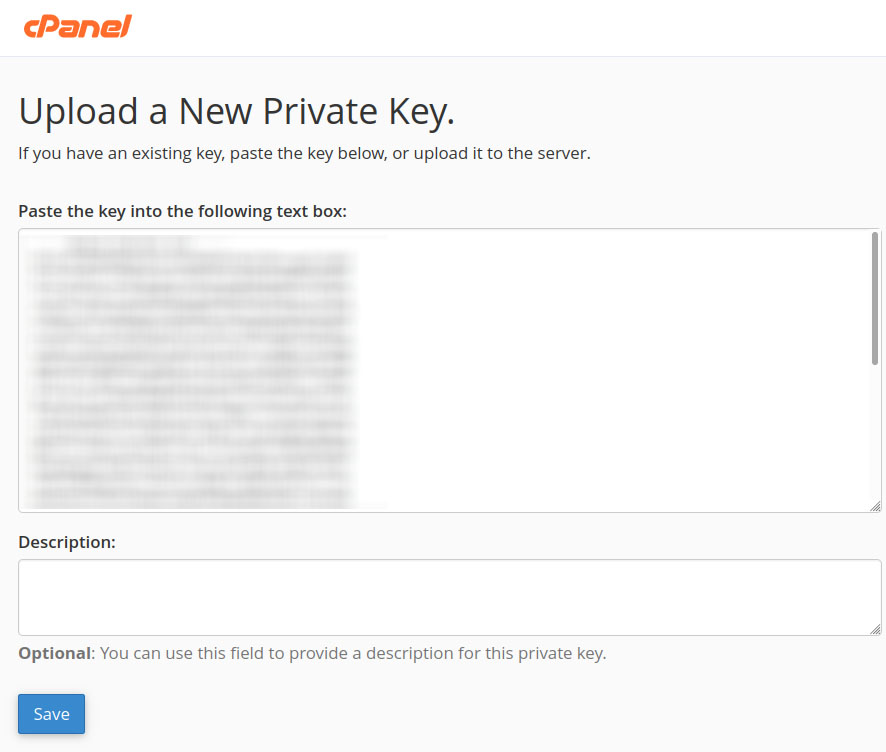
Step 2: Upload the Private Key to cPanel
Now switch to your cPanel dashboard to upload the private key:
- Log into cPanel
- Navigate to Security → SSL/TLS
- Click Private Keys (KEY) under “Generate, view, upload, or delete your private keys”
- Scroll to the Upload a New Private Key section
- Paste your private key from Cloudflare into the text area
- Add a description like “Cloudflare Origin Certificate 2025” so you can identify it later
- Click Save
Step 3: Upload the Certificate to cPanel
Next, upload the Cloudflare Origin Certificate itself:
- Return to the main SSL/TLS page in cPanel
- Click Certificates (CRT) under “Generate, view, upload, or delete SSL certificates”
- Scroll to Upload a New Certificate
- Paste the Origin Certificate from Cloudflare (the entire block including BEGIN/END lines)
- Add a description like “Cloudflare Origin Certificate”
- Click Upload Certificate
cPanel will confirm the upload. You may see a warning that the certificate appears to be self-signed or from an untrusted CA—this is expected and normal for Cloudflare Origin Certificates. The certificate is trusted by Cloudflare, which is all that matters for this setup.
Step 4: Install the SSL Certificate on Your Domain
With both the private key and certificate uploaded, you can now install them on your domain:
- Go to SSL/TLS → Manage SSL Sites
- Under “Install an SSL Website,” select your domain from the dropdown
- Click Autofill by Domain—cPanel should automatically match the certificate and key you uploaded
- If autofill doesn’t work, manually select the certificate and key from the dropdowns
- For the Certificate Authority Bundle (CABUNDLE), you may need to add Cloudflare’s RSA root certificate
To get the CA Bundle, download the Cloudflare Origin RSA PEM from Cloudflare’s documentation. Do not use the ECC version with Apache cPanel—it causes compatibility issues. Paste this into the CABUNDLE field if cPanel requests it.
Click Install Certificate. cPanel will process the installation and confirm success. Repeat this process for any subdomains (www, mail, etc.) that need SSL coverage.
Step 5: Configure Full (Strict) Mode in Cloudflare
This step is crucial. You must tell Cloudflare to validate your new Cloudflare Origin Certificate:
- Return to your Cloudflare dashboard
- Go to SSL/TLS → Overview
- Change the encryption mode from Flexible (or Full) to Full (strict)
With Full (Strict) enabled, Cloudflare will verify that your origin server presents a valid certificate before establishing the encrypted connection. If the certificate is expired, misconfigured, or missing, you’ll see error 526—which is actually a good thing because it prevents insecure connections.
Step 6: Verify Your Installation
Test your setup to confirm everything works correctly:
Browser Test: Open a private/incognito browsing window and visit your website using https://. Click the padlock icon to view certificate details. You should see a certificate issued by Cloudflare (not your Cloudflare Origin Certificate directly—that’s used between Cloudflare and your server).
Command Line Test: Use curl to verify the connection:
curl -I https://yourdomain.com
You should receive HTTP/2 200 or similar success response. Any SSL errors will be clearly reported.
SSL Labs Test: Visit SSL Labs and enter your domain. Note: Because Cloudflare Origin Certificates aren’t publicly trusted, this test will show Cloudflare’s edge certificate (which is publicly trusted), not your origin certificate. This is expected behavior.
Troubleshooting Common Cloudflare SSL Errors
Even with careful configuration, SSL issues can occur. Here are the most common problems and their solutions when working with Cloudflare Origin Certificates and cPanel.
Error 525: SSL Handshake Failed
This error indicates Cloudflare couldn’t complete the SSL handshake with your origin server. Common causes include:
- No certificate installed: Verify the certificate is properly installed in cPanel under SSL/TLS → Manage SSL Sites
- Port 443 blocked: Check your server firewall allows inbound connections on port 443
- TLS version mismatch: Ensure your server supports TLS 1.2 or higher—Cloudflare requires at least TLS 1.0
- SNI issues: If hosting multiple domains, ensure Server Name Indication (SNI) is properly configured
- Cipher suite incompatibility: Your server must support cipher suites that Cloudflare uses
Check your server’s SSL error logs for specific details. For Apache, enable mod_ssl logging to capture handshake failures.
Error 526: Invalid SSL Certificate
Error 526 specifically means Cloudflare found a certificate but couldn’t validate it. This occurs when using Full (Strict) mode with:
- Expired certificate: Check the certificate’s expiry date in cPanel
- Self-signed certificate (not Cloudflare Origin): Install a Cloudflare Origin Certificate or publicly trusted certificate
- Certificate doesn’t match hostname: Ensure your certificate’s Subject Alternative Names (SANs) include the domain you’re accessing
- Missing CA bundle: Upload the Cloudflare Origin RSA PEM as your certificate authority bundle
As a temporary workaround, you can switch to Full mode (without Strict) which doesn’t validate certificates. However, this reduces security and isn’t recommended for production sites.
cPanel AutoSSL Conflicts
One of the most common issues when installing Cloudflare Origin Certificates in cPanel is conflict with AutoSSL. Here’s what happens: cPanel’s AutoSSL feature automatically provisions Let’s Encrypt certificates for your domains. When you install a Cloudflare Origin Certificate, AutoSSL may try to replace it during its next run, causing confusion and potential downtime.
Solutions to AutoSSL conflicts:
- Exclude domain from AutoSSL: In WHM (if you have access), go to SSL/TLS → Manage AutoSSL and exclude your domain from automatic certificate provisioning
- Use Cloudflare DNS-only mode temporarily: If AutoSSL can’t verify your domain through Cloudflare’s proxy, temporarily set DNS records to “DNS only” (grey cloud), let AutoSSL complete, then re-enable proxying
- Disable AutoSSL for the domain: If you’re committed to using Cloudflare Origin Certificates, disable AutoSSL for that specific domain
Note that cPanel may display warnings that your Cloudflare Origin Certificate is “not trusted” or appears expired—ignore these warnings. cPanel doesn’t recognize Cloudflare’s CA, but the certificate works perfectly when traffic flows through Cloudflare’s proxy.
Security Best Practices After Installation
Installing a Cloudflare Origin Certificate is just the beginning. Implement these additional security measures for comprehensive protection:
Enable HTTP Strict Transport Security (HSTS): In Cloudflare, go to SSL/TLS → Edge Certificates and enable HSTS. This forces browsers to always use HTTPS for your domain, preventing downgrade attacks. Start with a low max-age value and increase gradually.
Enable Authenticated Origin Pulls: This advanced feature ensures your origin server only accepts requests from Cloudflare. Go to SSL/TLS → Origin Server → Authenticated Origin Pulls and enable it. You’ll need to configure your web server to require Cloudflare’s client certificate, which is beyond basic cPanel configuration but highly recommended for sensitive sites. If you’re interested in more advanced security setups, check out my guide on optimizing WordPress with Cloudflare which covers additional security configurations.
Always Use HTTPS: Enable this option in Cloudflare (SSL/TLS → Edge Certificates) to automatically redirect HTTP requests to HTTPS. This prevents users from accidentally accessing your site over insecure connections.
Minimum TLS Version: Under SSL/TLS → Edge Certificates, set the minimum TLS version to 1.2. TLS 1.0 and 1.1 have known vulnerabilities and should be disabled unless you need to support very old browsers.
FAQ: Cloudflare Origin Certificate and cPanel
What happens if I disable Cloudflare after installing an Origin Certificate?
If you disable Cloudflare’s proxy (turning the orange cloud to grey) or remove your domain from Cloudflare entirely, your Cloudflare Origin Certificate will stop working. Visitors will see certificate warnings because the Origin Certificate isn’t publicly trusted—it’s only trusted by Cloudflare. You would need to install a publicly trusted certificate (like Let’s Encrypt) before disabling Cloudflare’s proxy.
Can I use a Cloudflare Origin Certificate for email (mail server)?
No. Cloudflare Origin Certificates only work for HTTP/HTTPS traffic that passes through Cloudflare’s proxy. Email protocols (SMTP, IMAP, POP3) don’t go through Cloudflare, so mail servers require separate, publicly trusted certificates. Use Let’s Encrypt or another CA for your mail subdomains (mail.yourdomain.com, smtp.yourdomain.com).
Why does cPanel show my Cloudflare Origin Certificate as untrusted or expired?
cPanel’s SSL checker doesn’t recognize Cloudflare’s Certificate Authority, so it flags Origin Certificates as untrusted. This is cosmetic and doesn’t affect functionality. As long as your DNS records are proxied through Cloudflare (orange cloud) and SSL mode is set to Full (Strict), the certificate works correctly. Ignore cPanel’s warnings in this case.
Can I use one Cloudflare Origin Certificate for multiple domains?
Yes, but with limitations. When generating a Cloudflare Origin Certificate, you can add up to 200 Subject Alternative Names (SANs). However, all domains must be in the same Cloudflare zone (account). For domains in different Cloudflare zones, you’ll need separate Origin Certificates. The wildcard format (*.example.com) covers subdomains but not the root domain—always include both example.com and *.example.com.
What’s the difference between Full and Full (Strict) SSL modes?
Both modes encrypt traffic between Cloudflare and your origin server, but Full (Strict) adds certificate validation. Full mode accepts any certificate—even self-signed or expired ones—while Full (Strict) verifies the certificate is valid, unexpired, and issued by a trusted authority (including Cloudflare Origin CA). Always use Full (Strict) with a Cloudflare Origin Certificate for proper security.
How do I renew a Cloudflare Origin Certificate before it expires?
With 15-year validity, renewal isn’t an immediate concern. However, when renewal time comes, generate a new certificate in Cloudflare (SSL/TLS → Origin Server → Create Certificate), then replace the old certificate in cPanel following the same installation steps. You can create the new certificate before the old one expires to ensure seamless transition. Cloudflare allows you to have multiple Origin Certificates active simultaneously.
I lost my private key. What do I do?
If you’ve lost your private key, you cannot recover it—Cloudflare only displays it once during certificate creation. You’ll need to revoke the old certificate (in Cloudflare, go to SSL/TLS → Origin Server, find the certificate, and click Revoke) and generate a new Cloudflare Origin Certificate. Then reinstall the new certificate and key in cPanel. This is why securely storing your private key is critical.
Secure Your Website Today
With over 88% of websites now using SSL/TLS encryption and Google prioritizing HTTPS sites in search rankings, implementing proper SSL is essential for both security and SEO. Installing a Cloudflare Origin Certificate in cPanel provides a reliable, long-term solution for encrypting traffic between Cloudflare and your origin server without the hassle of frequent certificate renewals.
Remember these key takeaways: always use RSA format for cPanel compatibility, set Cloudflare to Full (Strict) mode after installation, and keep your private key stored securely. If you encounter 525 or 526 errors, refer to the troubleshooting section above—most issues stem from misconfigured SSL modes or missing certificates.
For more advanced Cloudflare configurations, including caching strategies and performance optimization, check out my comprehensive guide on caching WordPress using Cloudflare.
Related reading:
- Crafting Your Own Private VPN on AWS: A Comprehensive Guide
- Setting Up an AWS EC2 CentOS Instance: A Comprehensive Guide
- Extend the File System of EBS Volumes on AWS EC2
Sources: Cloudflare SSL/TLS Documentation (2025), SSL Insights Statistics (July 2025), SSL Dragon Statistics (January 2025), Cloudflare Automatic SSL/TLS Blog (October 2024)

Husain Alhaboubi is Director of Digital Channels at Mobily, where he leads platform optimization, AI-powered customer engagement, and UI/UX strategy. With 20+ years of experience spanning eCommerce, IT infrastructure, and digital marketing, he previously drove a 225% revenue increase and 69% organic traffic growth as eCommerce Senior Manager at flyadeal, and managed enterprise IT operations — including data centers, ERP systems, and network security — as Group IT Manager at IPD Group.
Husain holds a BS in Information Systems from the University of Texas at Arlington and is certified in Google Ads, Google Analytics, and Semrush SEO. He writes from hands-on experience across both sides of digital business: the strategic (eCommerce, SEO, AI, digital transformation) and the technical (server administration, cloud computing, web development, networking, and security) — with a particular focus on the Saudi market and Vision 2030. Read his full resume →