

Cloudflare and cPanel AutoSSL
In order to enhance the security of your website and ensure a secure connection, configuring SSL/TLS certificates is crucial. One popular option is to utilize Cloudflare’s services for this purpose. By following a few simple steps, you can easily set up and install a Cloudflare SSL/TLS certificate on your website. This guide will walk you through the process, including generating the private key and CSR with Cloudflare, uploading the private key to cPanel, and finally, installing the Cloudflare certificate on your website. Once completed, you can verify the successful installation by checking the secure connection icon on your domain, such as the “Verified by: Let’s Encrypt” message in Firefox. Let’s dive into the detailed instructions to secure your website with a Cloudflare SSL/TLS certificate.
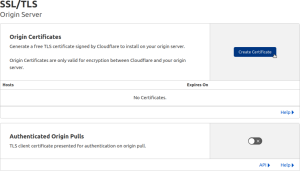
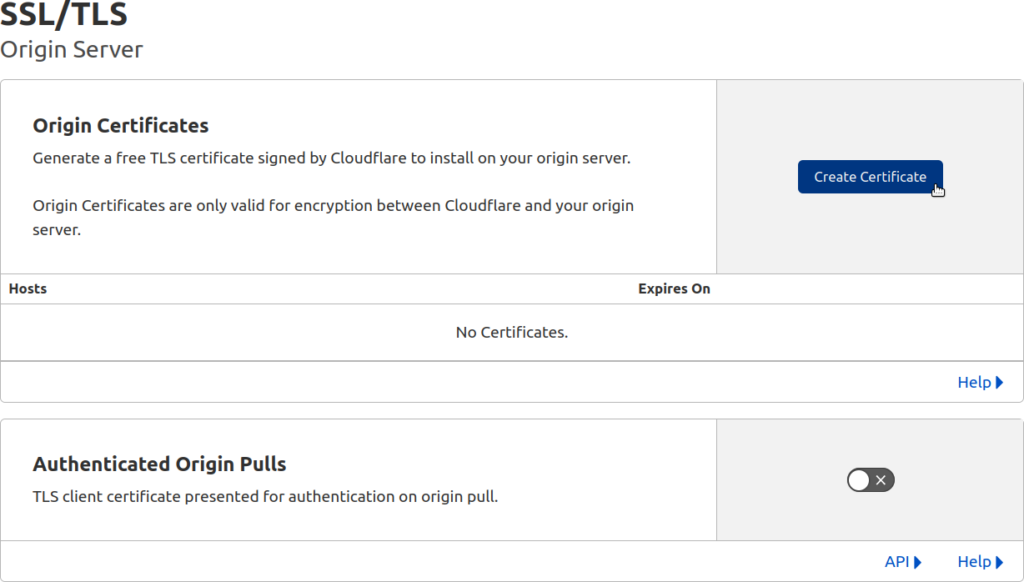
- Log into Cloudflare.com.
- On the left select “SSL/TLS” and “Origin Server.”
- Select “Create Certificate.”
- Select “Generate private key and CSR with Cloudflare.” Add all domains from your server. Finally, specify the certificate validity (15 years by default).
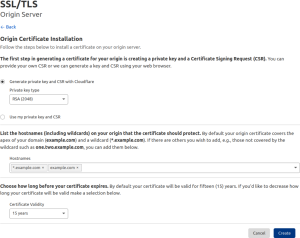
- Select “Create.”
- Copy the private key on the next page.
- Log into cPanel.
- Select “SSL/TLS.”
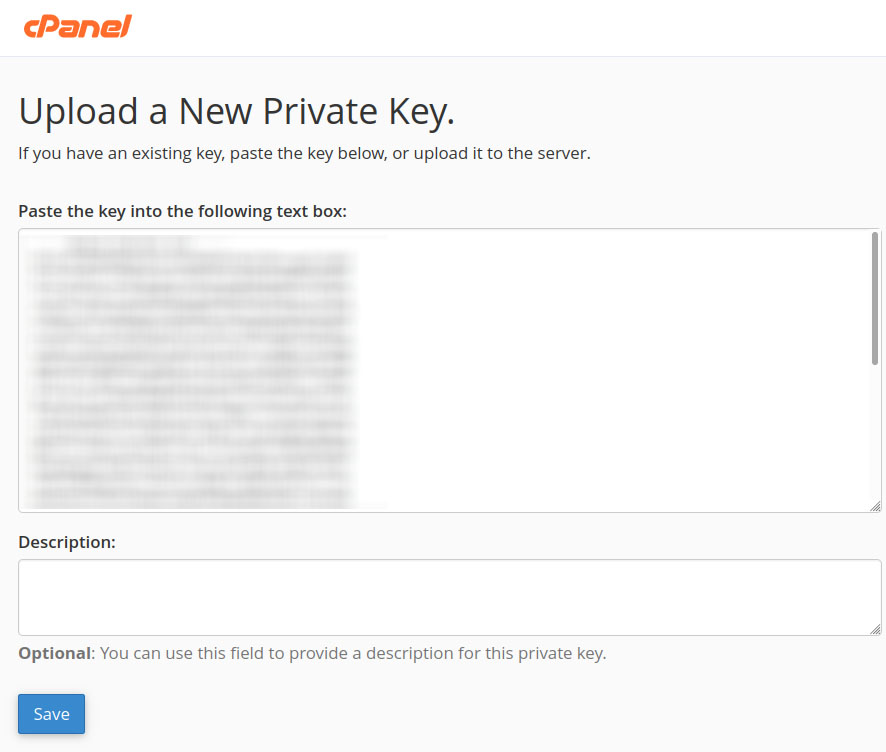
- Select “Generate, view, upload, or delete your private keys.”
- Select “Upload a Private Key.”
- Paste the Cloudflare private key under “Upload a New Private Key.” Add a description to help you remember the SSL is from Cloudflare.

- Select “Save” at the bottom.
- In Cloudflare, on the left select “SSL/TLS” and “Overview.”
- Change Flexible to “Full (Strict).”
- Back to Cloudflare, SSL/TLS > Origin Server, then click download on the private key you generated.
- Go to cPanel > SSL/TLS > Manage SSL Sites, then uninstall every certificate there.
- Go to cPanel > SSL/TLS > Generate, view, upload, or delete SSL certificates, paste the certificate code, and name it “Cloudflare”.
- Delete any other certificate there (recommended)
- Click on Install on the certificate you have just created.
- Choose the domains. You will have to do the same thing for all sub-domains
- Check your website in a private browsing session.
- Firefox users can select the lock icon to the left of their domain, then “Connection secure.” You should see “Verified by: Let’s Encrypt.”

In conclusion, securing your website with a Cloudflare SSL/TLS certificate is an important step in ensuring the privacy and integrity of your users’ data. By following the step-by-step process outlined in this guide, you can easily generate and install the necessary certificates, upload the private key to cPanel, and configure your website for a secure connection. With Cloudflare’s robust security features and the use of SSL/TLS, you can provide your visitors with a trusted and encrypted browsing experience. Remember to periodically check and renew your certificates to maintain the highest level of security. By implementing these measures, you can protect your website and build trust with your users, fostering a secure online environment for all.